

 |
| www.rapidswholesale.com |
Why People Convert Fridges to Kegerators
There are a lot of reasons why people buy these kegerator conversion kits. They make for a really inexpensive solution for a home brewer to share their passion with friends. A lot of people buy these for use in their garages and man caves; serving up domestic commercially brewed beers to their pals. Many are purchased by fraternities and other social groups with thirsty folk, and it’s not uncommon for a bar our civic organization to install them as an inexpensive satellite beer dispenser, away from their main bar – maybe on a patio or down by the dock. Whatever the reason, I’ve found these Rapids kits are the most complete and are really simple to install.Why Use a Rapids Conversion Kit?
 |
| Harry Ribble |
Rapids founder, Harry Ribble, was a former Pabst Brewery employee who actually designed and patented the first direct draw beer dispenser the world has ever seen. He left Pabst and started Rapids Wholesale way back in 1936. Rapids has built on that tradition of consistently ensuring full pint glasses for thirsty folks ever since. They work with brewers, distributors, bar owners, parts machinists and manufacturers nationwide. And now they’ve brought that expertise home to you.
Beer Dispenser Tapping Kits for Commercial Beer Dispensers
 |
| Commercial Kegerator |
Kegerator Conversion Kit Options
If you are starting from scratch with a home refrigerator, the Deluxe Kegerator Conversion Kits are the perfect “everything you need - one stop shop” solution. They come with either a dual gauge or single gauge regulator. For the little extra loot, I strongly suggest springing for the dual gauge regulator. The extra gauge lets you know when you are running out of gas. Invaluable information if you a planning a weekend get together with friends.
The Deluxe kits also include a beer line cleaning kit with all the tools you need to keep your keg fridge serving the best tasting beer with perfect pours. A clean beer dispensing system is essential to accurate taste and aroma as well as pouring dynamics. Dirty lines and faucets can cause huge heads and skunky flavors. Deluxe kits also have drip trays to save your floor when you over pour.
Super Kegerator Kits do not include the cleaning kit and drip tray. They come with a single gauge regulator and all the essential components needed to dispense along with a faucet brush and spanner wrench. The other configurations assume you already have a CO2 supply or faucet plumbing in place.
Rapids Kegerator Kit Installation Procedure
Kegerator Installation How-To Video
In this video, I'll show you the quick install of my latest conversion. Below the video you will find more information and tips and tricks for your installation.
Selecting the Donor Fridge
 |
| Fridgeman Concept |
For Quarter Barrel kegs (pony kegs) and traditional Full Sized kegs (actually called half barrel), you’ll likely need to opt for a full size refrigerator. You should budget for a 17 inch diameter for the keg and add the diameter of your CO2 cylinder (about 5-1/2 inches for a 5 lb. tank). Mounting the cylinder outside of the fridge and running a line through another hole in the side is an option, but obviously a little more engineering would be required.
Stripping Down the Refrigerator
 |
| Stripping Down |
Some refrigerators are not flat on the bottom. If there is a drawer unit, be sure to pull it out and look behind it to see if the floor extends all the way to the back wall. If not, you may have to devise some sort of platform to fit the keg on. I used a milk crate and plywood to get over the hump in mine. Putting a sheet of plywood down on the bottom is recommended even if you do have a flat bottom. It will prevent the floor from getting too banged up from moving the kegs in and out. Who knows, maybe one day you’ll want to sell this bad boy . . . might as well keep it pretty!
UNPLUG the refrigerator! Soon you will be drilling into it. Save yourself from potential electrical shock and an embarrassing trip to the ER . . . or worse. Don’t be an idiot, UNPLUG THE FRIDGE!
Drill Baby, Drill!
 |
| Drilling a 1 inch Hole in the Door for the Beer Shank |
Door mounting is a lot easier but can have its own set of smaller challenges. Some refrigerators may have in-door ice and water dispensers. Obviously, you’ll want to avoid drilling through those and any wiring that may support them. Locate a wiring diagram or schematics for your model and inspect it carefully before deciding where to place your faucet. Most fridges donated for this purpose are usually not that high tech.
Interior door shelving is another consideration. You will need to locate a faucet position that will not be obstructed on the inside by a door shelf. Find a location that provides the least distance to drill through. In my latest conversion, I did have to remove the door shelving entirely to provide enough room for a full size keg and cylinder within. It was a pretty narrow unit that wasn’t very deep. The one piece plastic molded shelving unit I removed also secured the door gasket, so I chose to attach the gasket with the sheet metal screws from the shelving and sealed it with a bead of silicone. Plastic trim pieces around the gasket in place of the removed shelving unit may be a better idea. Less mess anyway.
48 inches up from the floor is supposedly the ideal comfortable pouring height. That’s the target, but obviously your fridge design may cause you to stray a bit from that height. Another thing to keep in mind when you select your faucet position would be the faucet tap handle height.
The faucet knob that comes supplied with the Rapids kits is going to stand about three inches up from the faucet. Add another inch for the lever bonnet and collar on the faucet, and 1/2 inch for the radius of the hole you need to drill for the shank. That means if you use the small supplied tap handle it will stick up about 4-1/2 inches from your mark. Now look at your donor fridge. Does it have a freezer unit on top? See where this measurement becomes important? And did you have big plans to get an awesome ornate hand sculptedfaucet tap handle that sticks up 10 inches?
If you place your faucet too high, it may prevent you from being able to open the freezer door without running into the faucet tap handle. No frosty mugs for you! This is one of the reasons why elected to use a “side by side” donor fridge on my last conversion. With the freezer unit on the side of the fridge, I was able to place the faucet pretty much wherever I wanted. Another advantage to the side by side is more room top to bottom inside the fridge. I can place more shelving on top and I’m even considering stacking two pony’s with a keg stacker spacer for tapping and running another faucet!
Okay, now that you’ve settled on your faucet location that’s as close to 48 inches from the floor as it can be, but still will allow you to open the top freezer without a mess, you are going to want to mark it off and drill baby, drill. I’ve found that a 1inch hole saw with pilot bit works best to drill the hole (pictured above). Keep the pilot bit from sliding around by punching a divot in the door it can start on with a hammer and an awl.
Installing the Beer Faucet Shank
 |
| Shank Diagram |
Installing the Beer Faucet to the Beer Shank
 |
| Attaching Faucet to Shank |
On the top of the faucet you will attach the faucet knob or tap handle. If you get one of those fancy sculpted tap handles or maybe a branded tap handle, there is a neat little trick to make sure you have it front facing. What you do is spin the thing all the way down, then back it off until it is positioned the way you like it. Now if you spin the lever collar back to meet it, you can secure it in place facing forward.
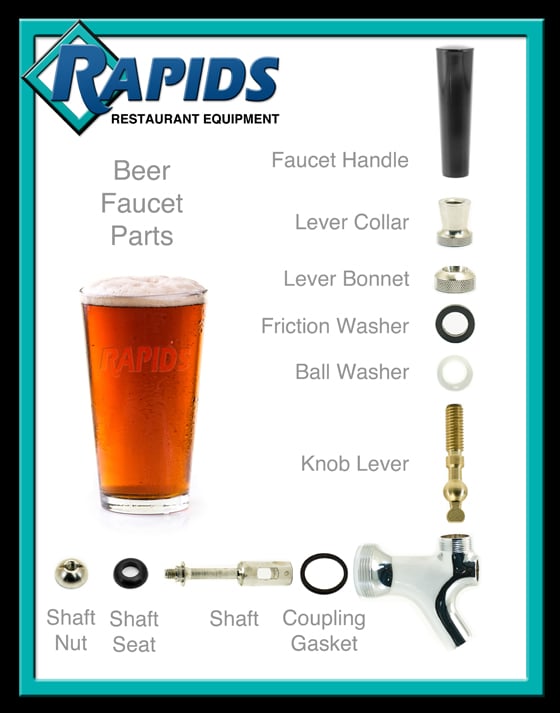 |
| Faucet Parts Diagram |
Attaching the Beer Line
 |
| Attaching Beer Line to Shank |
The opposite end of the beer line will attach to your keg coupler. The keg coupler is the piece that you use to actually tap the keg. Again, make sure you put a washer between this connection and snug it up with a wrench. It is possible the beer line will be longer than what you need to connect the beer faucet to your keg, but DO NOT cut or alter the line. This particular length has been factored in the regulator set up that comes up a little later.
 |
| Beer Line to Coupler |
Installing the Drip Tray (optional)
 |
| Optional Drip Tray |
The plastic drip tray fits on top of the holder and the grid platform goes right on the top of the tray. The drip tray is perfect for resting any glass of beer while or after pouring, but I would caution you, I have not attempted to rest a full sized solid glass pitcher full of beer on it, that might be a little too much. My smaller plastic pitcher did just fine. If you need the capability of holding a big glass pitcher, you might want to look at some of the more robust commercial drip trays, or reinforce this one by running longer bolts with washers and fasteners on the inside of the door.
Attaching the CO2 Line
 |
| Attaching CO2 Line |
 |
| Attaching CO2 Line |
Filling Your CO2 Cylinder and Attaching the CO2 Regulator
If you haven’t done so yet, have the CO2 tank filled by a professional. Due to shipping restrictions, they cannot be transported with anything in them. You can check with your local beer distributors on places they would recommend having your tank filled, or look for outfits in your area that service fire extinguishers. In Eastern Iowa, HawkeyeFire & Safety would be happy to help. They can supply you with not only CO2, but Nitrogen and blended gasses, and they can check and repair your regulator should it take a fall or grow tired over time. |
| Hawkeye Fire & Safety Website |
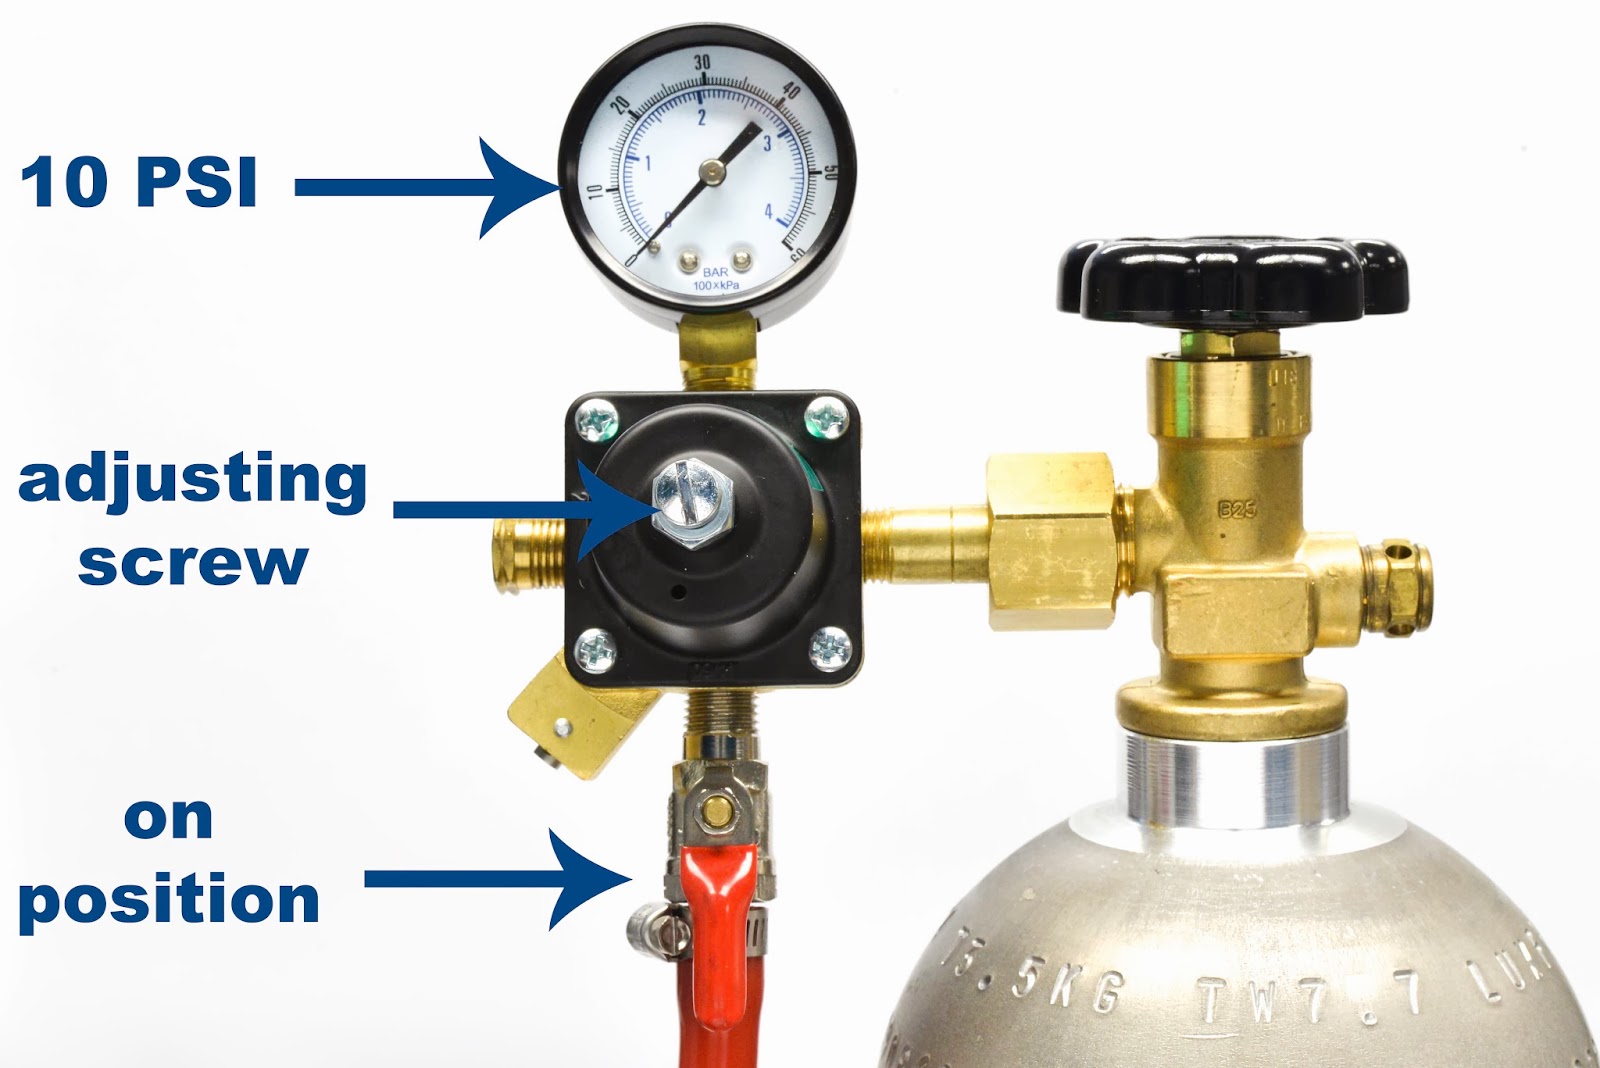
Okay, now that the cylinder if full, attaching the regulator is pretty straight forward. With the cylinder valve closed and the valve on the regulator closed, thread the coupling hex nut on the regulator on the cylinder. Tighten firmly with a wrench.
 |
| Attaching CO2 Regulator |
Tapping the Keg
 |
| Attaching Coupler |
Take the keg coupler and mount it to the keg. Do this by inserting the coupler into the locking neck of the keg and rotating the coupler clockwise. It’s best to hold the coupler by the metal parts at the bottom when doing this. Once it’s mounted, engage the coupler’s probe by either rotating the wing handle clockwise (wing style coupler) or pull the handle out and push down until it locks (lever handle style coupler).
Pressurizing the System
 |
| Spot It Leak Detector |
Pouring Beer
Finding the “sweet spot” for the perfect pour is an art all into itself. Variables like beer temperature, cabinet temperature, beer type, altitude, beer line length, beer line cleanliness, faucet cleanliness, resting state of the keg, type of glass, temperature of glass, and more all play a role. Check with your beer distributor for the ideal pressure and temperature. Most beers should be kept at around 35°F.When you pour, make sure you are using a clean glass. You want to hold it at an angle at the proper distance. Too close, you may not get enough head. Too far, and you may get too much head. It takes a little trial and error, but soon you’ll get there. The best tip I have to help you get closer to proper pour enlightenment with a balanced beer dispenser system is to open the faucet fully and quickly. Some folks mistakenly think you can regulate the head by partially opening or slowly opening the faucet. No way, that’s not how it works folks. Always open the faucet fully and quickly. I might let the first millisecond of the flow fall into the drip tray and then insert my glass into the flow depending on the beer type, but I always use a quick draw.
Good to the Last Drop
 |
| Kegerator Cleaning Kit |
The CO2 system should be “on” as long as there is beer in the keg. Shut it off when the keg is empty. Replace anything on the system that looks worn out, especially note the condition of o-rings, gaskets, and seals. Rapids carries all the replacement parts needed. You can find them at www.rapidswholesale.com.
Maintain a constant internal temperature. Monitor the cabinet temperature with a thermometer. The most accurate reading would be from a probe thermometer placed in a glass of water inside the refrigerator. This will tell you the likely temperature of the liquid beer inside the keg. Air temperature can vary depending on how the refrigerator circulates the air and where you place the thermometer. I put my thermometer in a glass of water right on top of the keg. 33°F for me, I like cold beer.
And remember, if you have any questions about the Rapids Home Refrigerator Kegerator Conversion Kits, feel free to buzz the Beer Experts at 1-800-472-7431 or jump on their online chat.
Cheers,
Paul